We collect basic website visitor information on this website and store it in cookies. We also utilize Google Analytics to track page view information to assist us in improving our website.
How It's Made: Slit CoilWednesday, August 31, 2022
|
||
|
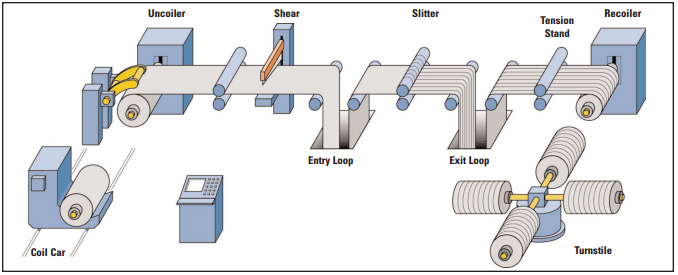
Coil slitting is a process where a large “master coils” are cut into narrower widths or “slit coils” specified by the end user. The slitting process has many different moving parts that are all critical in obtaining a quality coil for the end user. In the stainless steel and aluminum industry it’s essential for your processor to have advanced technology to maintain quality while keeping costs down. Below, we outline the steps and machinery we use to create our high quality slit coil products.
Master coils are loaded onto the Slitting line to set up the processing sequence. The coil is then unwound and fed into a pinch-roll “leveler” which flattens and guides the stainless steel and aluminum towards the slitter head.
The Slitter head is the central part of the slitting line that cuts or “slits” the master coil into multiple desired widths. The head is a series of rotary knives and spacers that are setup by the operator to provide the slit widths. When the knives and spacers are built to match the production order, it’s time to feed the coil through the slitting head.
The first 3-4 feet of the slit coils are test strips from which measurements must be taken to confirm coil widths are within tolerance, gauge thickness, edge condition, and free of any surface marks, lines, or other blemishes that would be problematic for the end user. Once the quality checks are completed, the material is fed over the looping pit (an optional piece of the slitting process), on towards to the tension stand.
To understand the utility of a looping pit and tension stand, you must first understand the physical properties of a coil. When coils are produced at the mill, they have what is commonly called a “crown” meaning the outside edges are thinner than the center of the coil. When slitting many different narrow strips (that are side-by-side) from one master coil, the thicker center material naturally builds up a larger outer diameter on the recoiler and causes a variance in tension across all of the strips.
The larger the diameter, the faster the recoiler pulls through the center strips while the thinner outer strips recoils much slower on the smaller diameter. To overcome the recoiled variance in the coils outer diameters, and the difference in each strips’ “take-up” speed, they are “looped” into a 50’ deep formed pit allowing each slit coil enough slack to compensate for the difference in diameters.
The Tension-Stand aids in the process by keeping all of the strips under a consistent “controlled tension” eliminating “flutter” i.e. up/down vibration, to produce tight even coils with flush side-walls and perfect diameters. Without the looping pit and tension-stand, line operators must resort to a make-shift solution by placing cardboard or other paper products into the rolls to artificially increase the outer diameters of the thinner strips. Processing coils without a Loop-pit also run the risk of inducing camber into the material at high tensions or tearing light gauge aluminum.
The material final stage is the recoiling of the slit coils at the end of the line into the specified ID (inner diameter) and OD (outer diameter). Each cut is separated by small round “separator-disks” on an arm that prevents any lateral movement of each slit coil, thus forming a perfect smooth vertical “wall” on the coil. The material is then banded and pushed off the recoiler onto an exit coil car destined for the packaging department.
Every Slitting line has slightly different components and processes depending on the required end product. Armour Alloys uses modified line technology for enhanced processes such as PVC applicators, laser guides, video monitoring, and entry looping pits… which we will introduce in another blog! |
||
|
||
|
||
|
|

|
|
Generic Administrator 2 April 29, 2025 |